 Questo tutorial è ancora in fase di testing, se sei tra le “cavie” fammi sapere come ti sei trovato!
Per fare lezione online sarebbe meglio cercare di ottimizzare il suono che arriva al nostro interlocutore. Il problema principale di solito è fare in modo che chi è dall’altra parte riesca a sentire la nostra voce, il nostro strumento e una eventuale base musicale in modo chiaro e distinto. Visto che sono utente Windows vi spiego come farlo in questo ambiente, in ambiente Mac parlano bene di Loopback che però è a pagamento.
Per noi invece il software è gratuito e si chiama Voicemeeter: è un mixer virtuale che prende vari ingressi sia “reali” (il vostro microfono o gli ingressi della scheda audio) che “virtuali” (un mp3 che state suonando, un video su Youtube) dal vostro PC, li miscela e li smista in uscite “reali” (le vostre casse o le uscite della vostra scheda audio) e “virtuali” (cioè quello che sentirà il vostro interlocutore su Zoom, o Skype, o quant’altro).
In questa pagina vi spiego il metodo più semplice, se invece vi sentite più tecnologici potete andare al metodo più complesso (ma anche molto più flessibile).
Prima di tutto
Il microfono integrato del proprio laptop ha grosse limitazioni sonore, come potete immaginare, ma come dice il proverbio “piuttosto che niente è meglio piuttosto”. Se vi trovate in queste condizioni, sarebbe meglio stare abbastanza vicini al microfono e, se si usa una chitarra elettrica, fare in modo che l’amplificatore sia appena dietro di noi (a volumi contenuti!!!) e non “sotto”, se no dall’altra parte si sentirà un vago eco del suono nella stanza.
Il metodo di gran lunga migliore è dotarsi di una scheda audio che faccia da “ponte” tra il nostro strumento e il computer e, se serve, di un microfono.
Step 1: installare Voicemeeter
Step 2: impostare l’uscita audio del PC
Step 3: impostare l’uscita del mixer
Step 4: impostare gli ingressi audio
Step 5: impostare Zoom o Skype
Bonus: migliorare il suono della chitarra in diretta
Step 1: installare Voicemeeter
Andate sul sito VB-Audio e scaricate Voicemeeter a questo link. In questa pagina vi spiego la versione più semplice di Voicemeeter, ne esistono anche due versioni più complesse chiamate Banana e Potato che sono il famoso “metodo più complesso” di cui sopra.
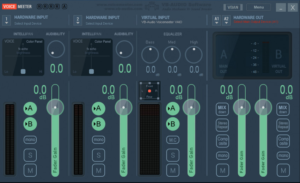
Installatelo e riavviate il computer. Al riavvio, lanciate il programma (lo trovate ovviamente nel menu Start in basso a sinistra). In sovrimpressione la struttura di base:
Step 2: impostare l’uscita audio del PC
Ora dobbiamo dire al nostro PC di dirigere l’audio verso Voicemeeter. Cliccate con il tasto sinistro del mouse sull’icona a forma di altoparlante della barra in basso. Selezionate “VoiceMeeter Input” come dispositivo di riproduzione.

Step 3: impostare l’uscita del mixer
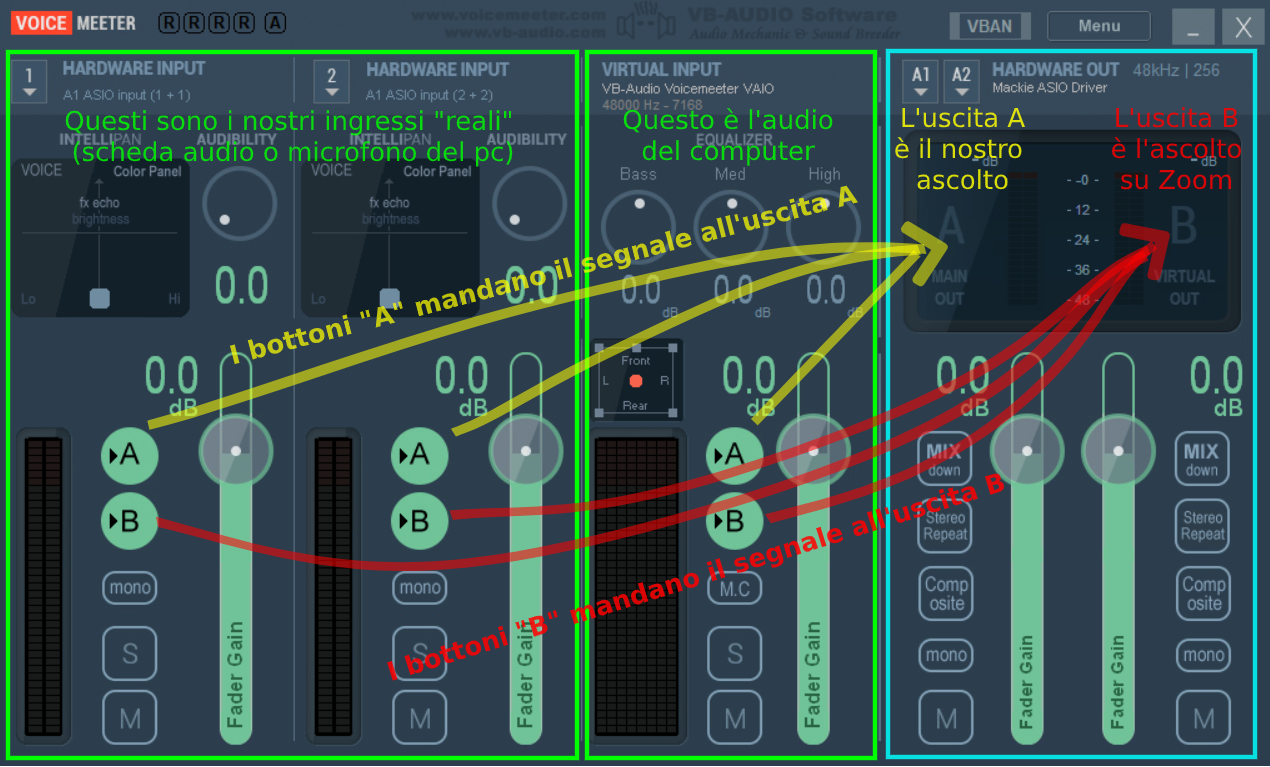
Ora dobbiamo dire a Voicemeeter dove fare uscire l’uscita A, cioè il nostro ascolto. Se avete una scheda audio, cliccate su A1 nel pannello più a destra e scegliete come uscita hardware la riga ASIO corrispondente alla vostra scheda audio. IMPORTANTE: Se non vedete la riga ASIO corrispondente alla vostra scheda audio, vuole dire che non avete installato i driver. Andate sul sito del produttore e scaricateli!
Se non avete una scheda audio, selezionate l’uscita da cui sentite normalmente l’audio del vostro computer, se possibile con il formato WDM.

Facciamo una prova: suonate un mp3, o guardate un video dal vostro PC. Il terzo canale, quello dell’input “virtuale”, dovrebbe dare segni di vita, e visto che il canale è per ora assegnato sia all’uscita A che alla B, dovrebbero muoversi anche i due meter di uscita.

Step 4: impostare gli ingressi audio
Adesso dobbiamo dire a Voicemeeter a cosa far corrispondere gli ingressi hardware, cioè i due canali più a sinistra.
Se non avete una scheda audio, possiamo assegnarne solo uno. Cliccate sulla scritta “hardware input”: si aprirà un menu a tendina con un po’ di opzioni. Selezionate WDM>il vostro microfono (ovviamente il nome cambia a seconda delle marche).

Probabilmente, sarà meglio disattivare l’assegnazione all’uscita A altrimenti sentirete la vostra voce tornare indietro dalle casse con un fastidioso effetto di eco (caso migliore) oppure il tutto andrà in feedback e comincerà a fischiare (caso peggiore).

Se avete una scheda audio, potete assegnare agli “hardware input” di Banana gli ingressi 1 e 2 della vostra scheda audio. Cliccate su Menu e poi System Settings / Options…

Cliccate sui trattini di “Patch ASIO inputs to strips”: in questo modo state dicendo a Voicemeeter di “vedere” gli ingressi 1 e 2 della scheda audio e di incanalarli nei canali 1 e 2 del mixer virtuale. Il motivo per cui lo fate due volte per canale è che gli ingressi sono stereo, quindi se lo faceste solo sul quadratino di sinistra sentireste il segnale solo nel canale sinistro.

Anche qui, se avete un microfono, vi conviene disattivarlo per evitare feedback indesiderati (Vedi sopra)
Se avete una scheda audio ma non avete un microfono, potete usare la scheda audio come ingresso per la chitarra elettrica (o quant’altro) e usare il microfono integrato del laptop: in tal caso uno dei due ingressi hardware dovrà essere nuovamente settato come il microfono di sistema (Vedi sopra)
“Sì ok, bello. Ma il suono della chitarra elettrica in diretta fa schifo!!!”
Beh, un po’. In fondo alla pagina vi spiego come renderlo più bellino e fare a meno dell’amplificatore, se siete impazienti cliccate qui!
Step 5: impostare Zoom o Skype
È arrivato il momento di impostare l’applicazione per la videochiamata. L’esempio che vi do io è per Zoom, ma potete fare analogamente su Skype, Meet etc. Fate partire l’app e cliccate sull’ingranaggio in alto a destra.

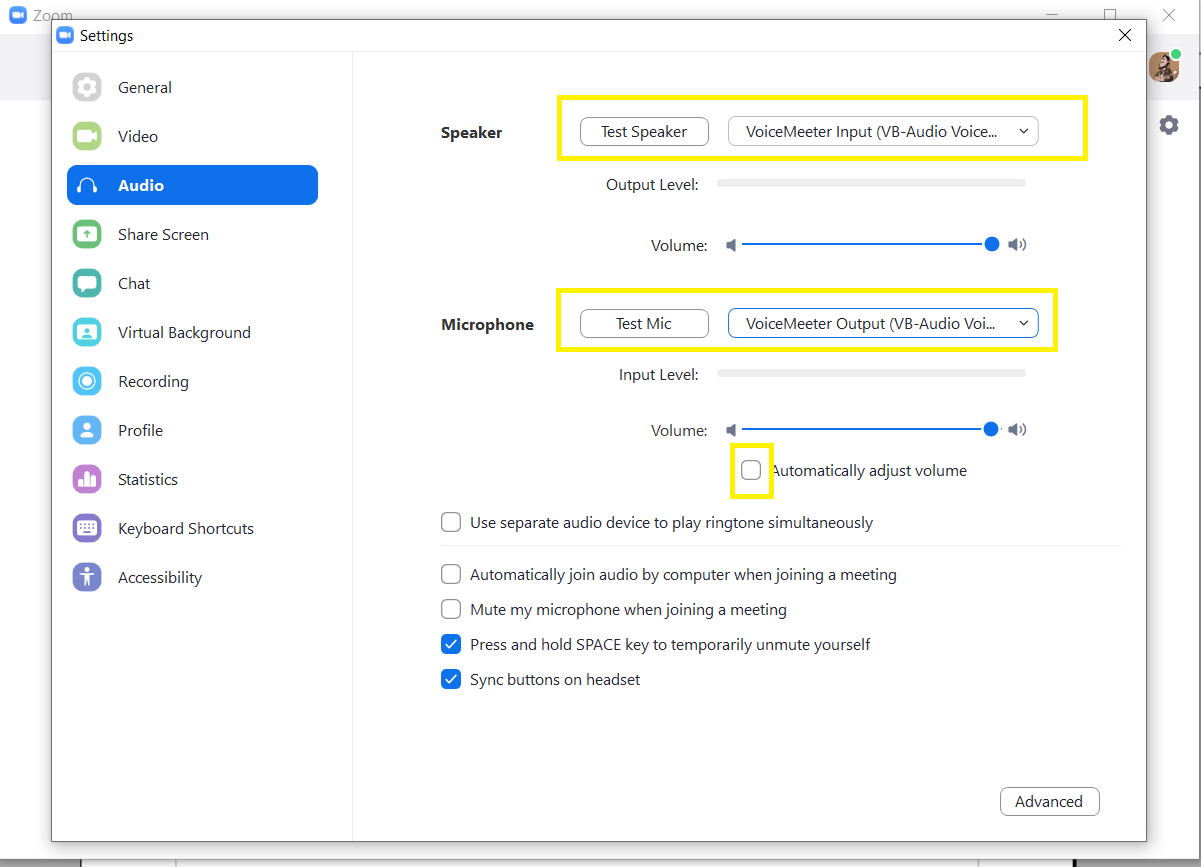
Nei settaggi audio selezionate VoiceMeeter Input come speaker e VoiceMeeter Output come microfono e disabilitate il controllo automatico del volume. Fate un test audio per essere sicuri che vada tutto bene!
Nei settaggi audio avanzati copiate queste impostazioni:

Siamo pronti! Adesso potete gestire separatamente i volumi della vostra voce, del vostro strumento e della base. Buona lezione! 🙂
“Ma la chitarra in diretta nella scheda audio fa schifo!” Come migliorare il suono
Se volete migliorare il suono (ammettiamolo, bruttino) di una chitarra elettrica in diretta nella scheda ci sono un po’ di possibilità:
- Collegare alla scheda il line out del vostro ampli, se ce l’avete
- Collegare alla scheda un pedale multieffetto, se ce l’avete, assicurandovi che l’opzione di simulazione dell’ampli e del cabinet sia attiva (in questo modo evitiamo l’effetto zanzara sui suoni distorti)
- Usare un “amplificatore virtuale“. In rete ce ne sono tantissimi, di quelli che possono funzionare anche standalone (cioè senza bisogno di una DAW come Cubase, FL o Reaper) e che sono gratuiti posso consigliare Amplitube, Guitar Rig o AmpLion. In tutti i casi nel programma dovrete specificare l’input (l’ingresso della scheda audio) e l’output (il solito Voicemeeter).
- Usare una DAW come Cubase, FL o Reaper. Questa scelta è super flessibile, anche perché vi permette di registrare, ma richiede un settaggio certosino. Se siete interessati andate nella pagina dedicata al settaggio più complesso.
Buon lavoro!
Questo tutorial è ancora in fase di testing, se sei tra le “cavie” fammi sapere come ti sei trovato!
This tutorial is still in the testing phase, I would love your feedback!
To take lessons online, you should try to optimize your sound going to the other side. The main problem, usually, is making sure that whoever is on the other side can hear our voice, our instrument and any musical backing track in a clear and distinct way. Since I am a Windows user I will explain how to do it in this environment, in the Mac environment I’ve heard good things of Loopback which however is not free.
For Windows users, however, the software is free and is called Voicemeeter: it is a virtual mixer that takes various inputs, both “real” (your microphone or the inputs of the sound card) and “virtual” (an mp3 you are playing, a video on Youtube ) from your PC, mixes and sorts them into “real” outputs (your speakers or the outputs of your sound card) and “virtual” (ie what will be heard on Zoom, or Skype, or whatever) .
In this page I’ll explain the simpler method, if instead you feel more technological you can go to the more complex method (which is also much more flexible).
First of all
Your laptop’s built-in microphone has big sonic limitations, as you can imagine, but we can make do if you don’t have anything else. If you are in these conditions, it would be better to stay rather close to the microphone and, if you are using an electric guitar, make sure that the amplifier is just behind us (at low volumes !!!) and not below, otherwise the other side will hear just a vague echo of the room sound.
By far the best method is to have an audio interface that acts as a “bridge” between our instrument and the computer and, if necessary, a microphone.
Step 1: install Voicemeeter
Step 2: set the PC audio output
Step 3: set the mixer output
Step 4: set the audio inputs
Step 5: set up Zoom or Skype
Bonus: improve your guitar sound with no amp
Step 1: install Voicemeeter
Go to the VB-Audio website and download Voicemeeter. In this page I’ll explain the simpler version of Voicemeeter, there are also two more complex versions called Banana and Potato which are the famous “more complex method” mentioned above.
Install it and restart your computer. When it restarts, launch the program (you can obviously find it in the Start menu at the bottom left). Here is its basic structure:
Step 2: set the PC audio output
Now we have to tell our PC to send the audio out to Voicemeeter. Click with the left mouse button on the speaker icon of the bar at the bottom. Select “VoiceMeeter Input” as the playback device.
Step 3: set the mixer output
Now we have to configure Voicemeeter’s hardware output A, which is our monitoring. If you have an audio interface, click on “A1” in the rightmost panel and choose the ASIO line corresponding to your sound card as the hardware output. IMPORTANT: If you don’t see the ASIO line corresponding to your sound card, it means that you have not installed the drivers. Go to the manufacturer’s website and download them!
If you don’t have an audio interface, select the output from which you normally hear the sound of your computer, if possible in the WDM format.
Let’s see if it works: play an mp3, or watch a video from your PC. The third channel, your “virtual” input, should give signs of life, and since the channel is currently assigned to both output A and B, the two output meters should also move.
Step 4: set the audio inputs
Now we have to configure Voicemeeter’s hardware inputs, i.e. the two leftmost channels.
If you don’t have a sound card, we can only assign one input. Click on “hardware input”: a drop-down menu will open with a few options. Select WDM> your built-in microphone (obviously the name changes according to the brands).
It will be probably better to turn off output A for this channel, otherwise you will hear your voice coming from the speakers, with an annoying echo effect (best case) or a high-pitched feedback noise (worst case).
If you have an audio interface, you can assign inputs 1 and 2 of your sound card to Voicemeeter’s hardware inputs. Click on Menu and then System Settings / Options…
Click on the dashes of “Patch ASIO inputs to strips”: this way, you are telling Voicemeeter to “see” inputs 1 and 2 of the sound card and to channel them into outputs 1 and 2 of the virtual mixer. The reason you do it twice per channel is that the inputs are stereo, so if you only did this on the left square you would hear the signal only in the left channel.
As in the “no sound card” case, if you have a microphone, it’s probably better to turn it off to avoid unwanted feedback (See above).
If you have an audio interface but not a microphone, you can use it as an input for the electric guitar (or whatever instrument) and use the laptop’s integrated microphone: in this case one of the two hardware inputs must be set again as the system microphone (see above).
“Yeah, ok, cool. But the sound of the electric guitar straight in the sound card sucks !!!”
Well, yeah, a little bit. At the bottom of the page I will explain how to improve it and do without the amplifier, if you are impatient click here!
Step 5: set up Zoom or Skype
It’s time to set up the application for video calls. The example I give you is for Zoom, but you can do the same on Skype, Meet etc. Start the app and click on the gear at the top right.
In the audio settings select VoiceMeeter Input as speaker and VoiceMeeter Output as microphone and disable automatic volume adjustment. Do an audio test to make sure everything is fine!
In the advanced audio settings copy these settings:
We are ready! Now you can manage the volumes of your voice, your instrument and the backing track separately. Have a good lesson! 🙂
“But the sound of the guitar straight in the sound card sucks!” How to improve the sound
If you want to improve the (let’s face it, not too appealing) sound of an electric guitar straight in the audio interface there are a few possibilities:
- Connect the line out of your amp, if you have one
- Connect a multi-effect pedal, if you have one, making sure that the amp and cabinet simulation option is active (in this way we avoid the harsh “mosquito effect” on distorted sounds)
- Use a “virtual amp“. There are many on the net, among those which can also work standalone (i.e. without the need for a DAW like Cubase, FL or Reaper) and are free I can recommend Amplitube, Guitar Rig or AmpLion. In all cases in the program you must specify the input (the input of the sound card) and the output (the usual Voicemeeter).
- Use a DAW such as Cubase, FL or Reaper. This choice is super flexible, because it allows you to also record what you’re doing, but requires a painstaking setting work. If you are interested, go to the page dedicated to the more complex setting.
Buon lavoro!!!